How to Make PDFs Accessible
Although the Portable Document Format (PDF) is a handy format, it happens to be terrible at distinguishing background, images, icons, and text, making it inaccessible for users depending on assistive technology to read the PDF.
For PDF content to be accessible, each visible element must have an accessibility tag. Tags help assistive technology recognize your content as intended. Use this guide as a checklist for any PDF intended to be posted for public view on MGA websites.
- For general guidance on color, image, and text accessibility, refer to the Web Content Accessibility Guide.
- Adobe provides detailed training material for PDF accessibility in its Acrobat Accessibility Series.
Table of Contents
Creating a New PDF
The best way to create an accessible PDF is to start with an accessible authoring tool, such as Microsoft Word or Adobe InDesign.
- MS Word: Text is the easiest part of content to make accessible. Refer to the “ How to Make MS Word Documents Accessible” guide for step-by-step instructions on how to create an accessible Word document and export it as a PDF. This will help create a PDF document that is mostly accessible and requires minimal remediation via Adobe Acrobat Pro.
- Adobe InDesign: For complex designs, using Adobe InDesign to assign heading levels and content order can help make remediating accessibility tags in Acrobat Pro easier. Refer to the Creating accessible PDFs guide by Adobe.
Remediating an Existing PDF
Any existing PDF that must be made accessible requires remediation. First, see if these questions apply to your PDF:
- Can it be deleted?
- Does it need to be a PDF? Can it be converted to a different format?
- For interactive forms, consider converting it to a Microsoft Form.
- For general information, convert it to a page on Cascade.
If the questions do not apply to your document(s) and it must remain as a PDF, download the file, open it in Adobe Acrobat Pro, and refer to the following instructions to make sure your PDF is accessible.
Prioritize remediating any template documents you may have to prevent any future copies of the template from being inaccessible.
1. Add a Title to the PDF
Before we do anything else, please add a title to your PDF.
- Go to “Menu” → Click on “Document Properties”
- In the first “Description” tab, fill out the “Title,” “Author,” and “Keywords” fields.
- Keywords are terms you’d like to be able to search for your PDF by, separated by commas (ex: PDF accessibility guide, document format guide)
- Click “OK”
- Click “Save”

Adding a title to your document prevents it from becoming one of the many “Untitled” PDFs on the MGA website
2. Prepare a Form for Accessibility Remediation
If your PDF is not a form and does not contain fields for users to fill out, skip to the next step.
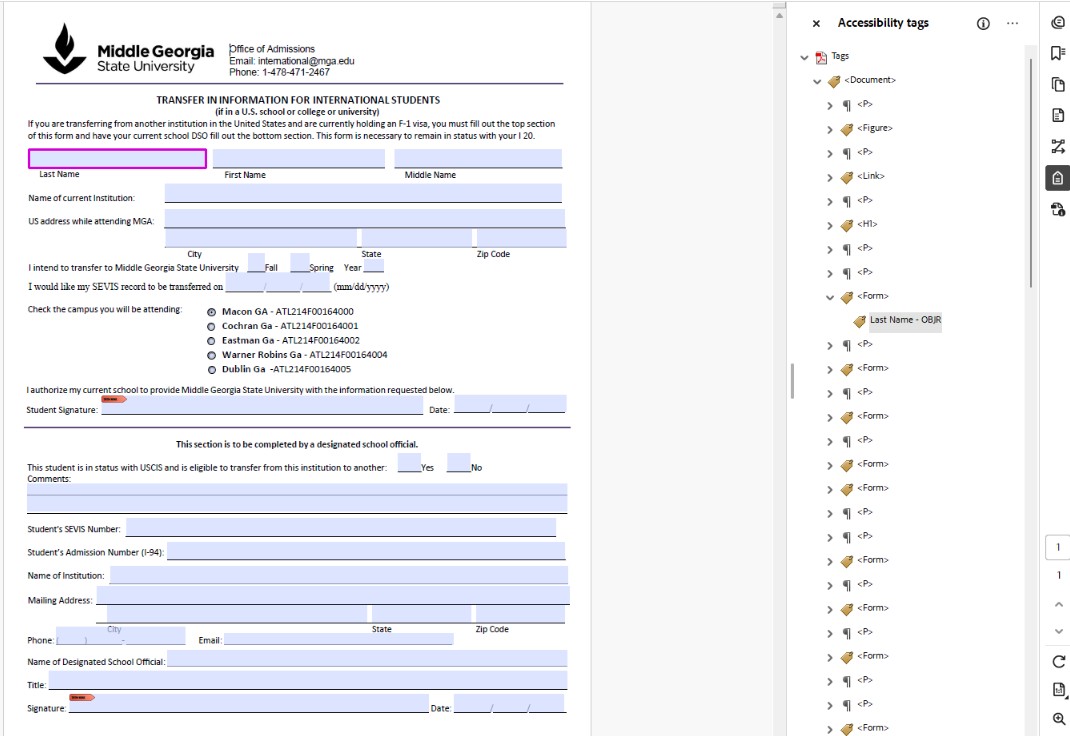
- First, you must create your fields within Adobe. When remediating a form with blank fields created with underlines in Word, the PDF will not recognize that they are fields until you create them in the “Prepare a form” feature on the left pane (If there are no tags that read "OBJR" in the tags pane, the form is not accessible).
- Click on “Prepare a form” → Click the toggle box for “This document requires signatures” if it does → click the “Create form” button. Similar to the autotag feature, this will automatically populate form fields for what the PDF guesses might be a fillable field. image here
- Review the fields from the right-side “Fields” pane. All fields will be read as is (ex: fields named “undefined” will be read as “undefined” in voice assistive technology).
- To edit the fields, right-click on them from the “Fields” pane, click “Properties,” edit “Name” and “Tooltip.” It is recommended that the name and tooltip are identical. Voice assistive technology will read the tooltip field to the user.
- Organize the fields in the right order. Now it’s time to add accessibility tags for every form field.
Tip: For a step-by-step guide, watch Adobe’s “Adding form fields to a tagged PDF” guide (watch time: 1 hour).
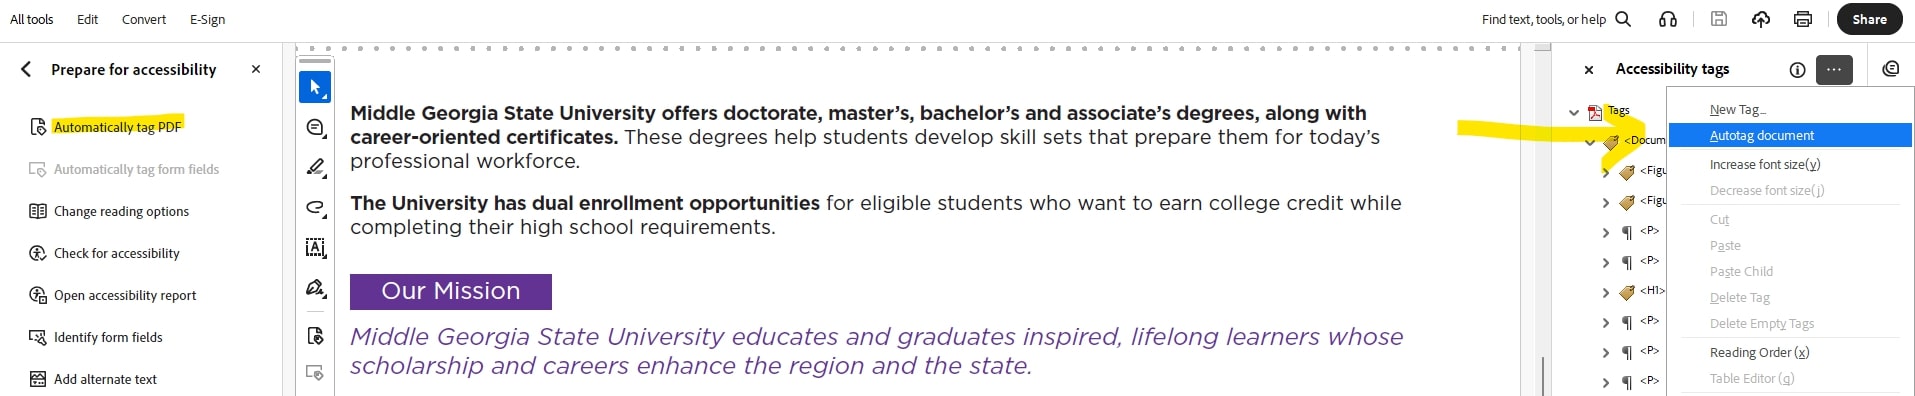
3. Autotag Your PDF
Autotag is a built-in accessibility tag creation feature within Adobe Acrobat Pro. This helps you create tags without having to start from scratch.
- Go to “All tools” on the top left menu.
- Click on “Prepare for accessibility” (If you do not see it, click on “View more” at the bottom of the list of tools and scroll through the tools).
- Hover your cursor over the right-side bar with a column of icons. Right-click and check “Accessibility tags."
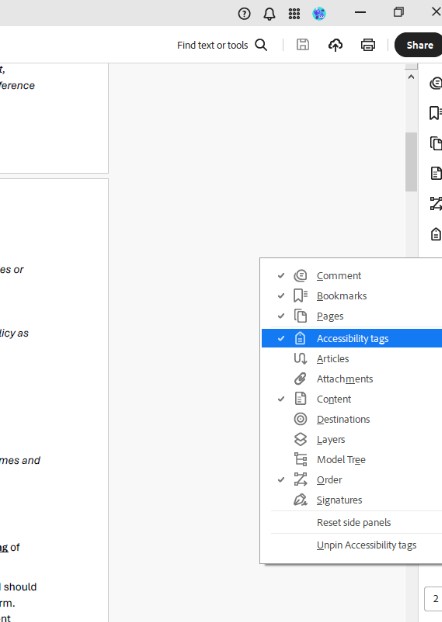
- Click on the tag icon. This will open up the accessibility tags pane on the right-side of the PDF.
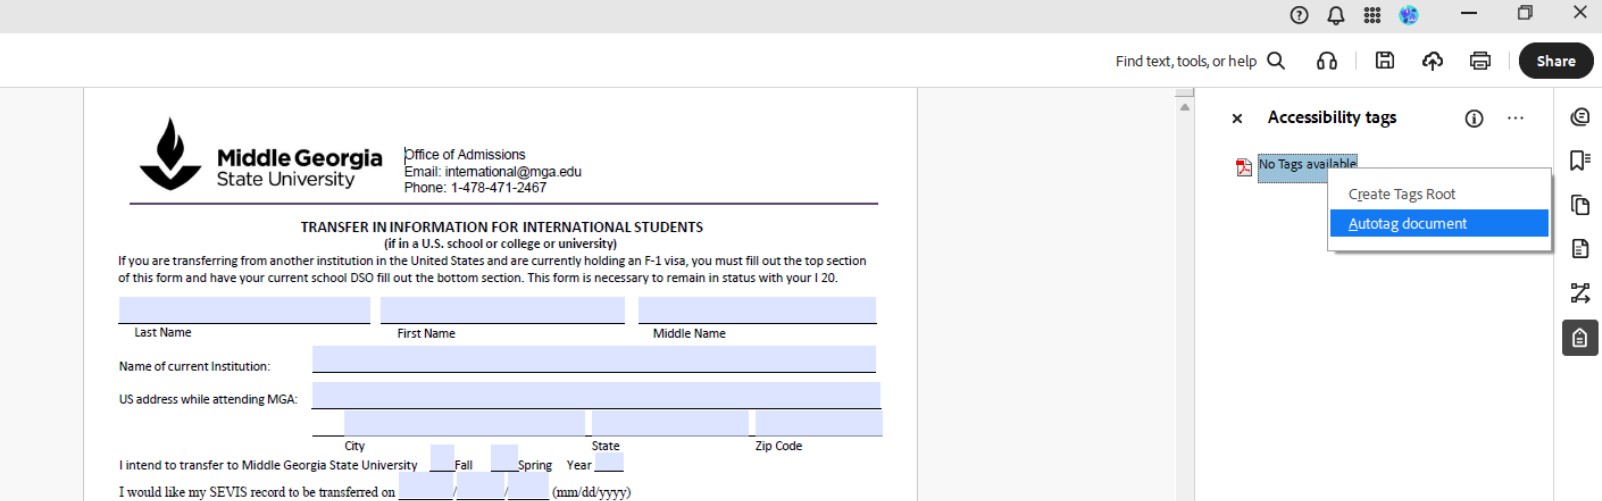
- There are three ways to automatically tag your PDF:
- Left pane, under “Prepare for accessibility,” click “Automatically tag PDF.”
- Right pane, click on the three-dot menu (...) on the top-right corner and click “Autotag document.
- Right pane, right-click on “No Tags available” or any existing tag → click “Autotag document.”
Tip: Autotag is not reversible. Tags created via autotag will override any manual edits you make. Make sure to save often and create copies of the PDF throughout the remediation process to avoid losing hours of progress.
4. Fix & Create New Tags for All Visible Content
Since the autotag feature can only guess the best way to tag your PDF, all tags must be checked manually to make sure it accurately represents your content.
These are the 4 tag types to look out for; they require extra steps to make accessible:
- <Documents> tag: the main tag for a PDF. All tags should be nested within the Documents tag. If there is no Documents tag, create one.
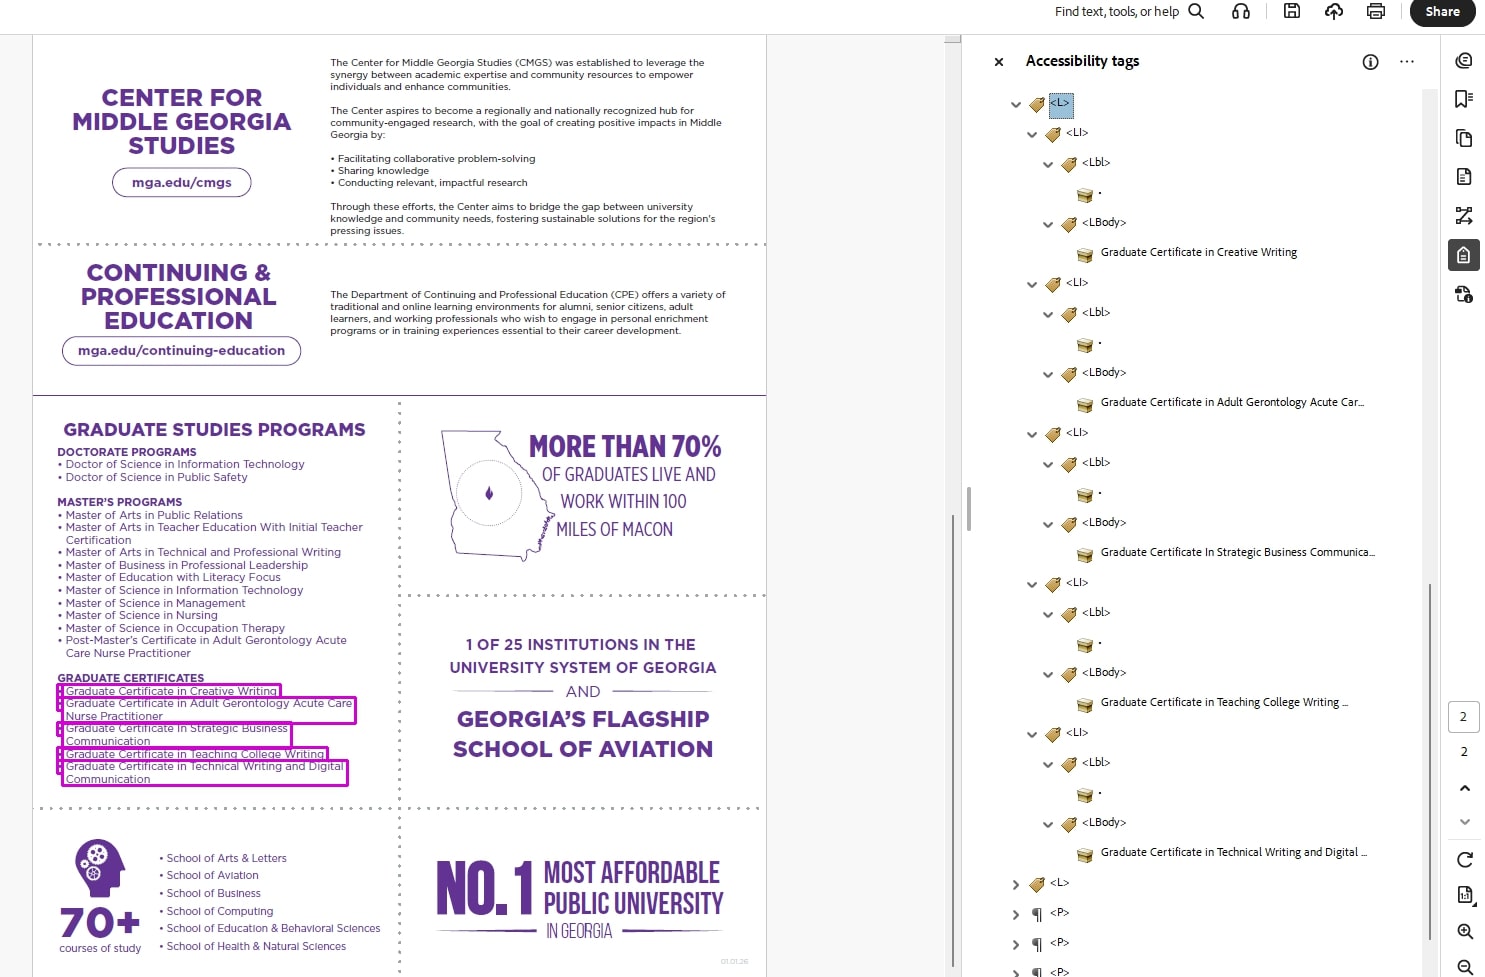
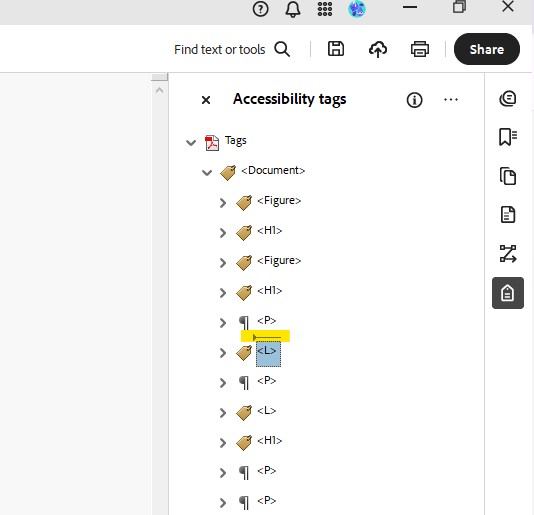
- <L> List tag: a tag for all types of lists. Every list requires that a <LI> list item tag be nested within it for each item in the list. If the list contains a bullet, number, or symbol, nest the <Lbl> label tag for the bullet/number/symbol and a <LBody> list item body tag for the list content in each <LI> tag to be recognized as one list:
- <Table> tags: tags for tables. Read the “Tables” section below for more info.
- Artifact tags: decorative content. Marking tags as artifacts allows assistive technology to ignore them. Artifact any visual content that adds no meaning to the PDF. Sometimes autotag will tag empty spaces. These should be artifacted.
- For forms only: nest each field’s OBJR tag in a new <Form> tag. Field labels (ex: Last Name) should be nested in a <P> tag just like any other regular body text.
- Refer to the Common PDF Tags and Their Usage guide to figure out which tag to use.
- Watch an example from Adobe on using different tag types: Remediating an inaccessible PDF (watch time: 1 hour).
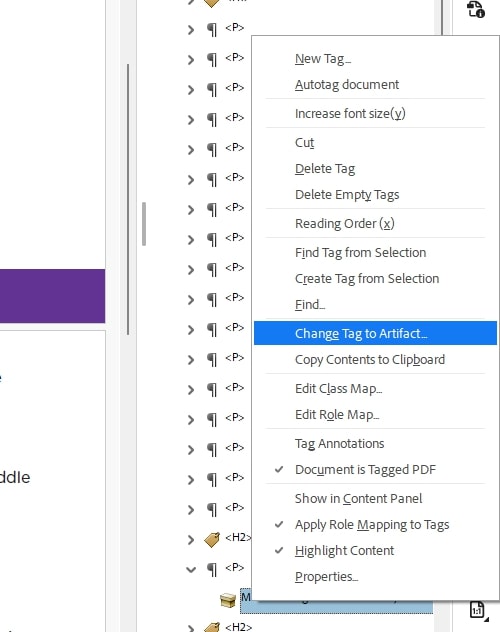
- You can change an existing tag type by right-clicking on the tag’s content on the right-side tags pane and select from a dropdown of all tag types from “Properties.”
Tips & Tricks
Save Often
Save your document often to create a backup to go back to. The “Autotag” button is unfortunately located right next to the “Add new tag” button. This means you may accidentally click “autotag” when you meant to create a new tag and lose hours of work. To avoid starting from scratch if this happens, make sure you have a saved version you can go back to.
Recommended: save your document every 3-5 edits. There is no “undo” for PDF accessibility features.
Moving Tags Around
There are two ways to move tags around. First, you can click & drag them. Second, you can cut & paste. Use whichever method works best for you:
- When you click & drag tags, you will see a gray arrow and horizontal line that appears where you’ll be placing the tag. A short line means you’ll be nesting the selected tag within a tag and a longer line means you’ll be placing it below a tag.
- Best practice is to keep your tags “lean,” which means to avoid nesting tags within tags when possible.
- To cut & paste tags, simply click on the tag you’d like to move and press “Cut” on the keyboard (Ctrl+X). Then click on a tag you’d like to place your tag below and paste (Ctrl+V). Tip: If the tag is expanded (the arrow left of the tag is pointed down instead of right), placing a tag below it will nest it into the tag. Collapse any expanded tags before moving tags to avoid accidentally nesting tags.
Shortcuts
Some common shortcuts also apply in the tags pane. Use them to save time on repetitive tasks (ex: artifacting decorative images all at once):
- Hold Ctrl + click multiple tags: select multiple separate tags.
- Click first tag + hold Shift + click last tag: selects first & last tag and all tags in between. Only works on tags within the same level/parent tag.
- Shift + *: expand all collapsed tags.
- Ctrl + Z: undo most recent tag move
5. Add Alt Text to All Images
There are two ways to add alternative text to images in a PDF:
- Right-click on the image tag
Autotag should be able to recognize images. Right-click on the image tag and edit the “Alternate Text” field. If your images are not in a figure tag, create a new <Figure> tag and nest the image tag within it. - Bulk edit from the Accessibility Pane
Go to the left-side pane and click on the “Prepare for accessibility” tool → click on “Add alternate text.” This will show a popup that allows you to designate alt text for all images from one place. Use the arrows to fill out all alt text before clicking “Save & Close.” Please note that marking images as a “Decorative figure” from this popup is not recommended; to artifact images, please select the image tags from the tag pane and right-click to artifact them as normal.
6. Add Alt Text to Links
The WCAG 2.4.4 requirement states that all links to a website on a PDF must programmatically provide an alt text that describes where the link directs users to. Find the “Link – OBJR” tag in your tags pane. Right-click, select “Properties,” and write the alt text in the “Alternate Description for Links” field.
If there is no “Link – OBJR” tag after autotagging the PDF, you’ll have to create a link tag:
- Go into the “Edit a PDF” tool from the left pane and click & drag to highlight the existing link in your document. Enter the link URL and click “OK.”
- Click the right-side tags pane and click on the “...” menu on the top-right of the pane.
- Select “Find” and choose “Unmarked Links” in the dropdown menu. Click the “Find” button. Then, click the “Tag Element” button. Now you should have a tag for the link that you can add an alt text to.

7. Tag a Table
If your document does not contain tables, skip to the next step.
Every table in a PDF requires the following tags:
- <Table>: the main table tag where all rows, columns, and data cells are nested.
- <TR>: table row tag
- <TH>: table header tag, usually nested within one <TR> tag
- <TD>: table data cell tag, usually nested within a <TR> tag
Without the proper tags, assistive technology will not be able to recognize how the table cells are related to one another and will read the table from left to right, row by row.
To assign the right reading order for a table, you must use the “Table Editor” feature to assign each table cell to its correct role (header row, header column, or data cell):
- Click the “Reading Order Tool” icon from the left-side icon selection pane.
- Click on the table on the page.
- Click “Table Editor” button that appears on the Reading Order popup.
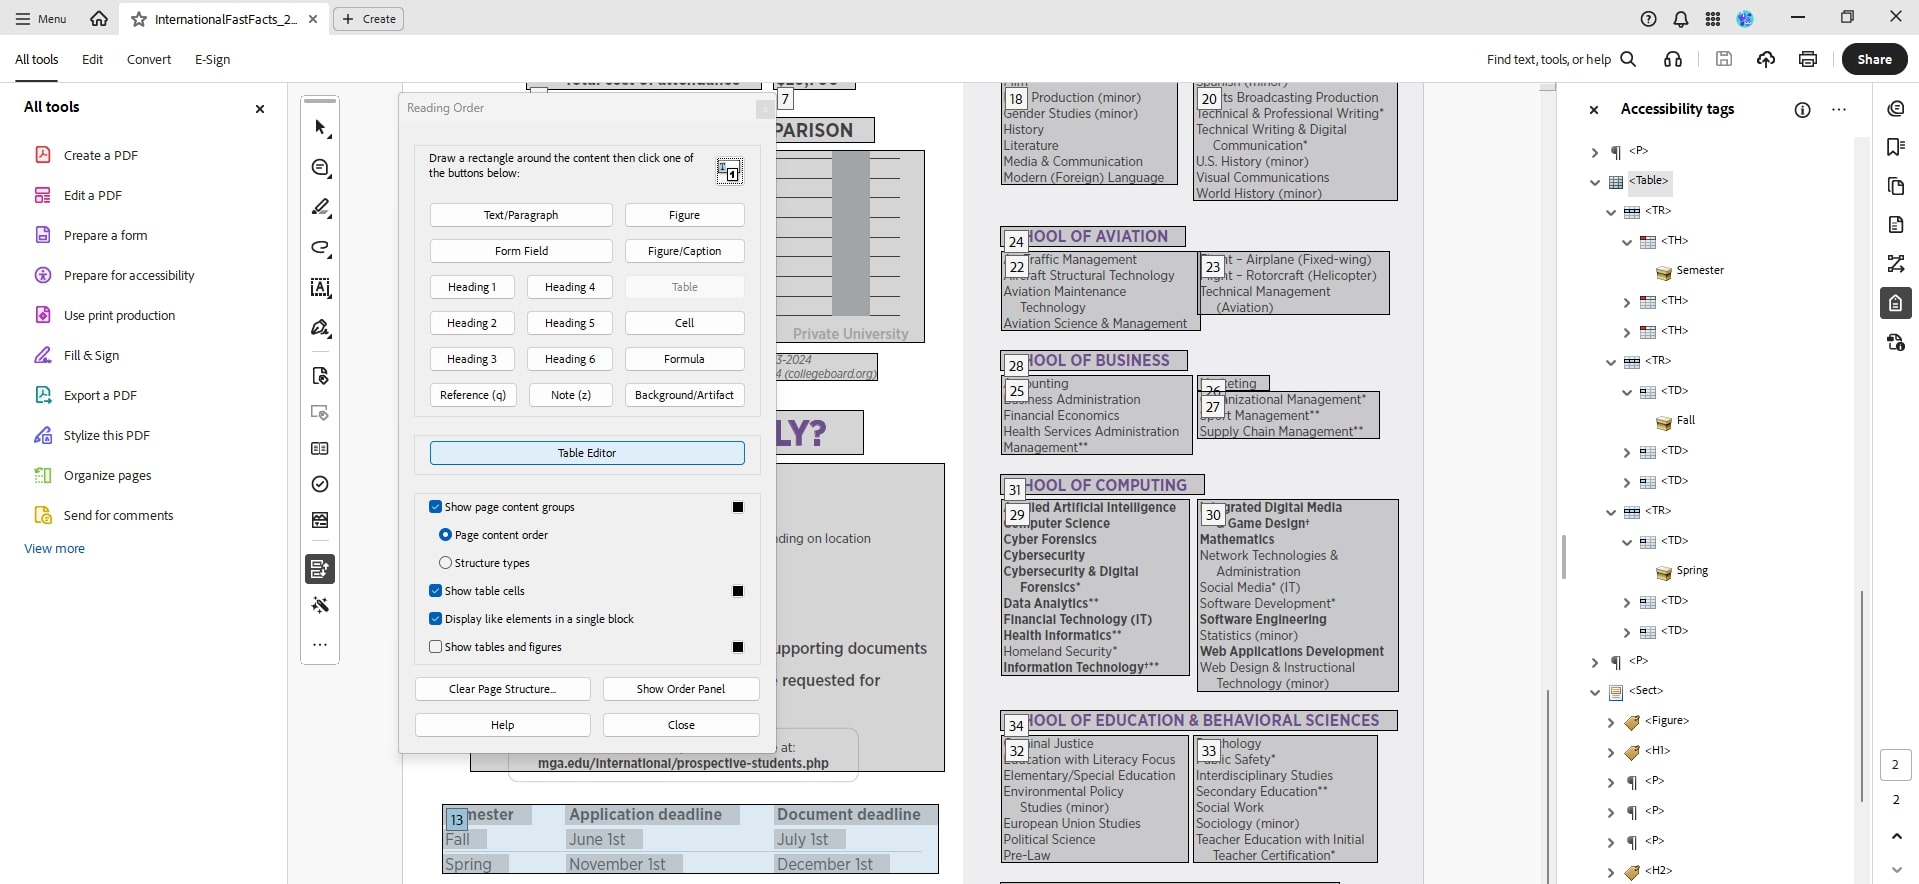
- The whole table should be highlighted in red. Now you can click & drag to highlight click each cell in the header row, right-click. and select on “Auto Generate Header Cell IDs.”
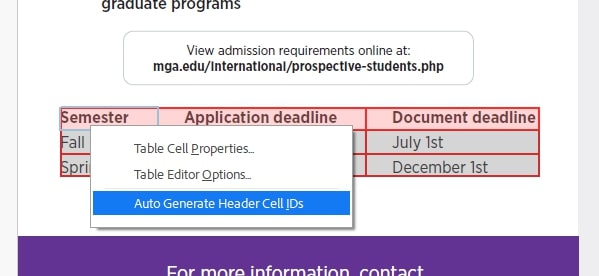
- Check the type, scope, and ID for each header cell by right-clicking and selecting “Table Cell Properties.” The ID field should have a new name indicating row, column, and name (ex: R1C1_Semester)
- Right-click on each cell (or click & drag to select multiple cells) in the table, click “Table Cell Properties,” click the plus icon (+) in the “Associated Header Cell IDs” section.
- Select the correct header cell ID for each data cell in the table.
- If your table is a complex table that contains merged cells and nested headers (sub-header rows or columns), you must adjust the “Row Span,” “Column Span,” and assign a scope in the “Table Cell Properties” popup. Refer to the Adobe guide on adjusting fields for complex tables: The Basics of Remediating an Inaccessible PDF (watch from 34:59 to 37:35)
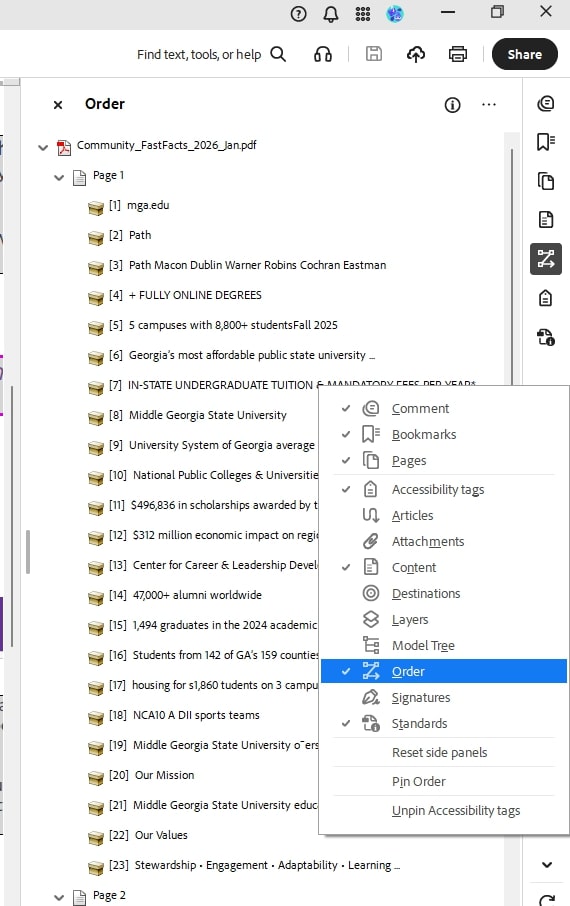
8. Organize Tags in the Correct Order
Once all content has been tagged, review the order of your tags.
Click on the topmost tag in the tag tree and press the down arrow on the keyboard. This is called “walking through the tag tree.”
Review all of your tags one by one to see if all the content in your document is properly tagged or artifacted. You will see each content on your PDF highlighted with a bright pink border for each corresponding tagged element as you go through the list.
Assistive technology depends on both the tags being in the right order and the “Reading Order” being set in the right order.
9. Review the Reading Order Pane
Open the Reading Order panel from the right-side menu. Go through all of the tags and make sure the content is in the same order as the tags.
- Moving the reading order around may change the order of your tags. You must set them in the right order again from the “Tags” panel.
- Moving the reading order may cause a text with a background color to disappear. You will have to go to the “Content” panel on the right-side menu, highlight all artifacts within the section, and move it above the tagged text to make it appear again.

The white text “+ Fully Online Degrees” appears as intended with a purple background because all artifacts are listed above the text’s container in the “Content” panel.
10. Check the Accessibility Report
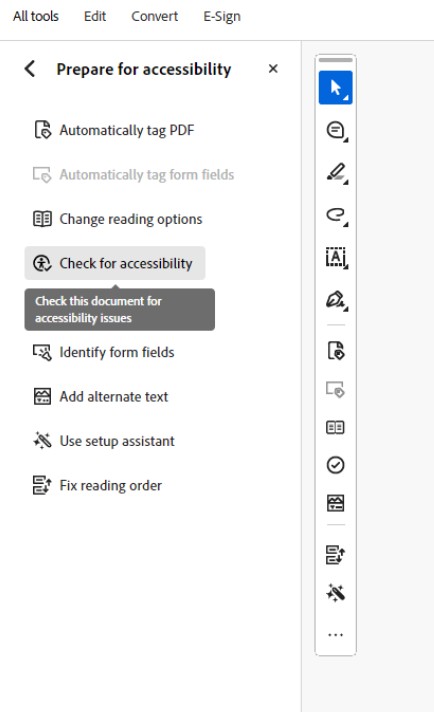
From the left-pane accessibility menu, click on “Check for Accessibility." A pop-up named “Accessibility Checker Options” will appear. Leave all the default options as is and click on “Start Checking.”
This feature checks to see if your content passes or fails the list of basic qualities an accessible document should have. Make sure to run the accessibility check for all your PDFs before publishing them for public view.
Click through issues that appear on the Accessibility Report. Right-click on each issue for information on how to fix them.
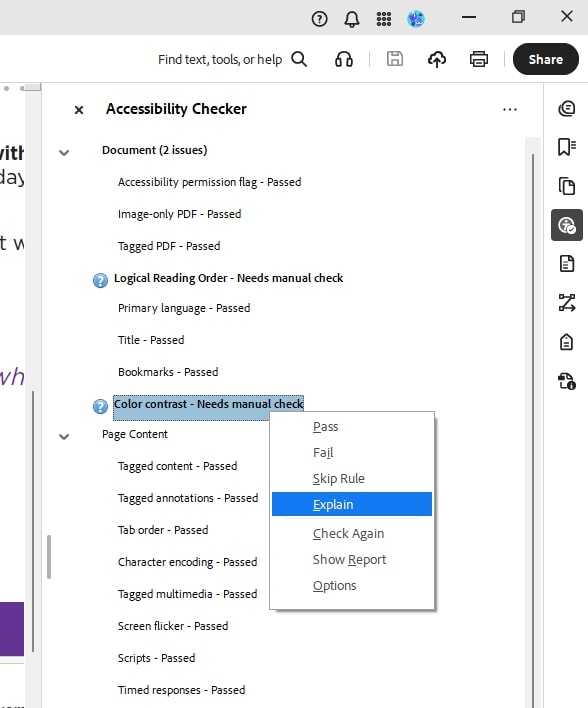
These two issues will always be marked because they require a manual pass/fail indication:
- Logical Reading Order (refer to the “Reading Order” section)
- Color contrast (refer to the “Color” section on the Web Accessibility Guide)
11. Saving a Tagged PDF
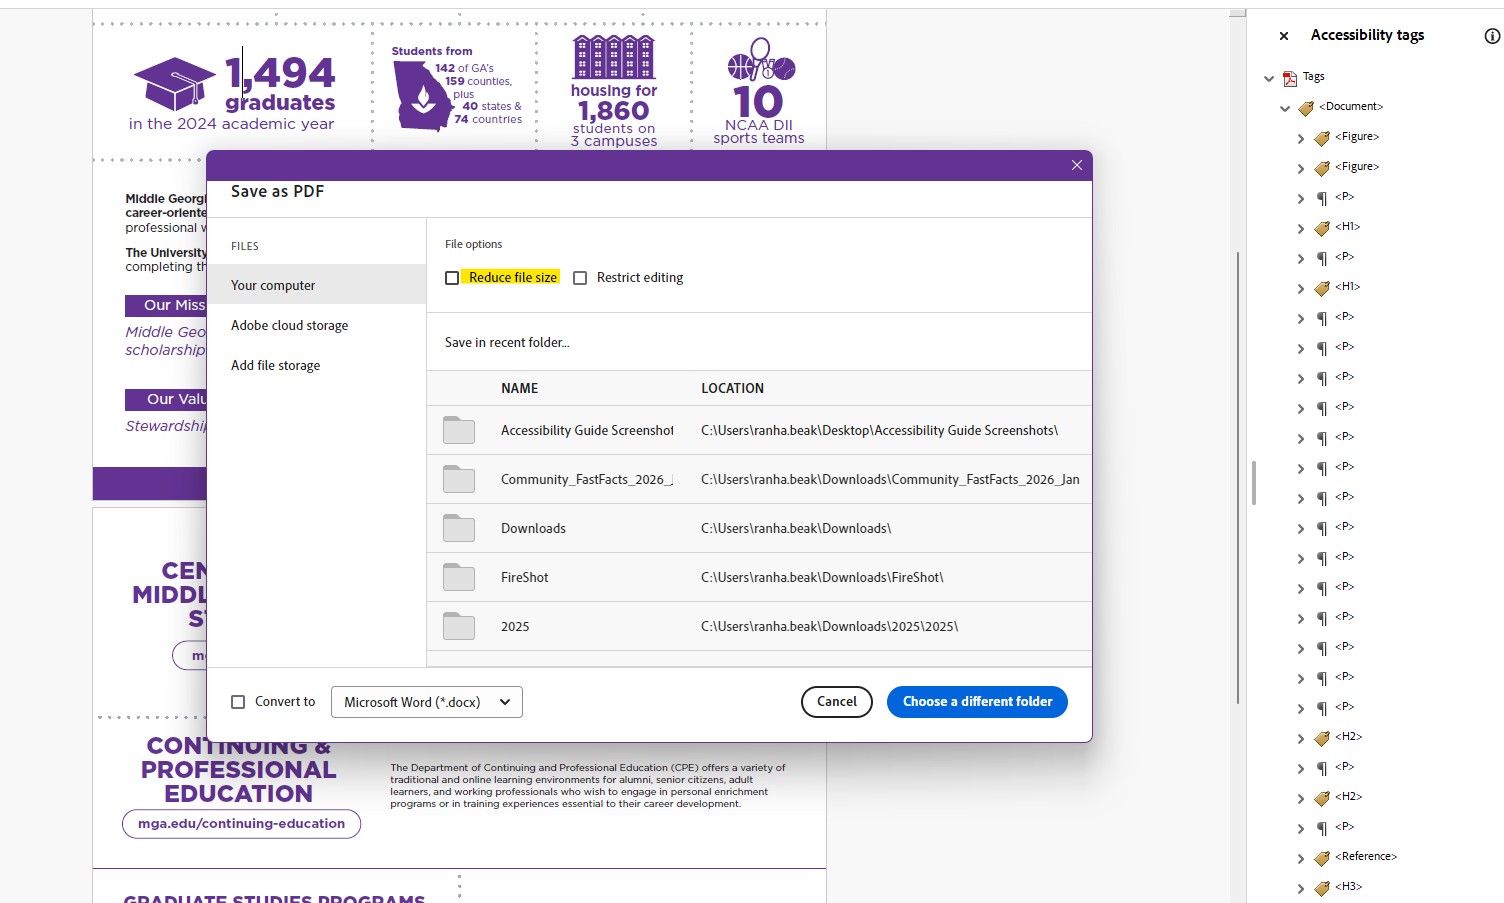
When saving the tagged PDF to post or share with the public, do not select "Reduce file size." This option will delete all tags.
Downloading the file as is first and then compressing it as a ZIP file preserves all the tags!
Helpful Resources
- Official accessibility guide by Adobe: https://helpx.adobe.com/acrobat/using/creating-accessible-pdfs.html
- Common PDF Tags and Their Usage: https://www.section508.gov/create/pdfs/common-tags-and-usage/
- Video tutorials by section508.gov: https://www.section508.gov/create/pdfs/training-videos/
- List of 23 best practice techniques for accessible PDFs published by W3C: https://www.w3.org/WAI/WCAG22/Techniques/#pdf
- For questions about remediating PDFs, contact
- For general questions about WCAG, contact
- For questions about creating accessible course content as a faculty member, refer to the CETL Accessibility guides.